
The Ultimate Guide to Designing Your Custom Event Badges
A great event badge does more than show someone’s name — it represents your brand, improves event security, and keeps everything running smoothly. A poorly designed badge leads to slow check-ins and networking fails. Whether it’s a music festival, trade show, or corporate event, the right badge design is the foundation for a successful, organized event.
At Arnett Credentials, we’ve created durable, custom badges for thousands of organizers across the country. Here’s everything you need to know to design badges that look sharp, scan fast, and last all event long.
1. Start with the Right Badge Material
Your badge’s material sets the stage for how it looks, feels, and performs during the event. The right choice balances visual quality, durability, and cost — depending on how long your event runs and who will be wearing it.
Popular material options include:
- Teslin® (Laminated) – Vibrant colors and durable for multi-day events.
- PVC or Plastic – Best for premium or reusable badges.
- Paper – Budget-friendly and great for single-day use.
- Holographic or Foil – Adds extra shine and built-in security.
Explore materials on our Event Badges & Passes page.
2. Pick the Right Size and Orientation
Badge size affects how easy it is to read, how it hangs on a lanyard, and how much space you have for branding. Choose dimensions that balance visibility with comfort—especially important for multi-day events where the badge is worn for 40+ hours.
Common sizes and uses:
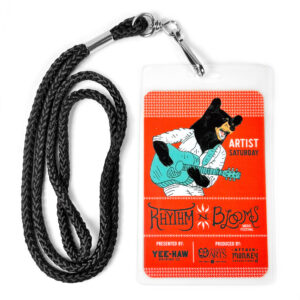
- 3″ × 5″ (Vertical): Compact and practical. Ideal for staff or vendors who need movement and clear role identification.
- 3.375″ × 5.5″ (Large Vertical): The gold standard for VIP and multi-day credentials, offering ample space for photos, names, and security features.
- Custom Die-Cuts: Use these unique shapes for maximum brand recognition or to give special sponsor shout-outs.
Pro Tips:
- Keep key text ¼” inside the trim line to prevent it from being cut off.
- Use a portrait (vertical) orientation for long lists or vertical logos, and landscape (horizontal) for wider layouts.
3. Design with a Clear Information Hierarchy
Good badge design guides the eye naturally. Think of it like a small billboard: your layout should highlight the most important info first and avoid visual clutter.
Suggested layout order:
Top: Event logo or name
Middle: Attendee name and role (e.g., CREW, VIP, MEDIA)
Bottom: Access level, sponsor logos, or QR/RFID area
Design tips:
- Use high-contrast colors for readability.
- Keep spacing clean and uncluttered.
- Limit fonts to two styles for a professional, consistent look.
4. Use Color to Simplify Access Control
Color is one of the fastest ways to identify who’s who at an event. It helps security teams and staff quickly recognize badge types — even from a distance.
Color-coding examples:
- Blue: Staff
- Gold: VIP
- Red: Security
- Green: Vendor or Volunteer
Choose colors that are easy to distinguish under indoor and outdoor lighting.
5. Add Smart and Secure Features
Event badges today are smarter than ever. Adding technology and security details can speed up entry, reduce fraud, and give your guests a smoother experience.
Recommended features:
- RFID or NFC chips for fast, contactless access.
- Barcodes or QR codes for quick scanning and check-in.
- Variable data printing for personalized names or numbers.
- Holographic overlays to stop counterfeiting.
- UV or micro-text for high-security areas.
Explore our Holographic Badges and RFID Wristbands for examples.
6. Focus on Comfort and Function
A great badge doesn’t just look good — it should be easy to wear, scan, and handle throughout the event. Consider how your badges will be used in real conditions.
Functionality checklist:
- Choose the right slot or hole punch for your custom lanyard.
- Use a matte finish to reduce glare, or gloss for a bold look.
- Round the corners to prevent peeling and improve durability.
- Ensure badges face forward and don’t twist when worn.
- Balance Branding and Sponsor Visibility
Badges are powerful branding tools. They appear in photos, videos, and social posts — so the design should reflect your brand while giving partners visibility.
Best practices:
- Place your event logo at the top or center.
- Position sponsor logos neatly near the bottom or on the back.
- Use the reverse side for a QR code, map, or mini schedule.
Keep the design balanced — too many logos or colors can distract from your brand.
8. Tailor Design by Event Type
Different events have different badge priorities. A festival badge may need to pop visually, while a conference badge should look sleek and professional.
Examples:
- Trade Shows & Conferences: Clean, brand-aligned, easy to scan.
- Festivals & Tours: Bold colors and holographic finishes that stand out.
- Corporate Events: Minimal, polished, and sponsor-friendly.
- Sports & Motorsport: Strong Teslin or PVC with RFID and reflective lanyards.
9. Prep Files for Print Like a Pro
A perfect badge starts with properly set up artwork. Small file mistakes can delay production or affect color accuracy, so follow these guidelines before you send your design.
Print setup checklist:
- Use CMYK color mode for accuracy.
- Minimum 300 DPI resolution for sharp images.
- Send vector logos (AI, EPS, or PDF formats).
- Include a ⅛” bleed on all sides.
- Review your free 24-hour proof carefully before approval.
At Arnett, we also offer PMS color matching so your printed colors match your brand exactly.
10. How to Get Started
Designing and ordering your custom badges is simple with Arnett Credentials. Whether you have print-ready artwork or need expert help from our design team, we make the process fast and stress-free.
Here’s how it works:
- Send your artwork or request a layout.
- Get your free digital proof in 24 hours.
- Approve for production (standard turnaround is 5–10 business days).
- Choose nationwide or convenient split-ship delivery.
Don’t let your badges be an afterthought—let them be a design highlight. Use the guide above to plan your perfect badge and get started with Arnett today.
Related Posts
")


